- By Worms4Earth
- May 26, 2025
- Getting Started, Worm Habitats
Are you ready to start composting with worms? Whether you’re an eco-conscious gardener or simply looking to reduce kitchen waste, building your own worm bin is an easy and budget-friendly way to begin vermicomposting. You have two main options for housing your worms: purchase a pre-made composting system or create your own with common household materials. In this guide, we’ll walk you through how to build a DIY worm bin using basic tools and supplies.
What You’ll Need
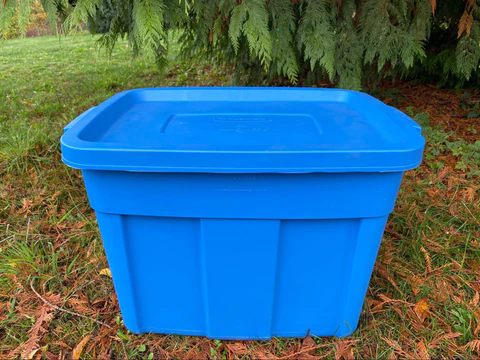
One 15–18 gallon plastic storage bin
Two bin lids (one for the top, one to use as a drip tray)
Drill and a 1/8″ drill bit
Bedding material: peat moss, shredded paper, composted cow, rabbit, or horse manure
Garden lime (optional)
Kitchen food scraps
Earthworms (we recommend 2 pounds of red wigglers)
Step 1: Drill Air and Drainage Holes
Using a 1/8″ drill bit, drill 15–20 holes along the upper sides of the bin for ventilation. Drill another 15–20 holes in the bottom for drainage. These holes ensure your worms receive adequate airflow and prevent excess moisture buildup.
Pro Tip: Place a second bin lid underneath your worm bin to catch any liquid (also known as leachate) or escaping worms.
Step 2: Moisten the Worm Bedding
Choose your bedding material—shredded newspaper, peat moss, coconut coir, or composted manure.
If using paper or peat moss, soak it in water until saturated, then wring it out like a sponge until it’s damp but not dripping.
Manure doesn’t need to be soaked.
If using coconut coir, follow our guide on how to rehydrate a coconut coir brick.
Important: Worms dislike soggy bedding. Aim for moist, fluffy bedding that feels like a wrung-out sponge.
Step 3: Add Bedding to the Worm Bin
Optional: Add a Cardboard Layer
Cut a piece of cardboard to fit the bottom of the bin. This helps reduce worm escape through the drainage holes.
Bedding Options:
Shredded Paper:
Fill the bin about ¾ full with moistened, fluffed paper.
Add a handful of garden soil for “grit” to help worms digest food.
Mist with water as needed.
Peat or Sphagnum Moss (3 methods):
Basic: Fill 6 inches with moistened peat. Add food scraps and fluff regularly.
Combo: Fill 6 inches with peat, then top with 4–5 inches of shredded paper.
Layered: Add 3 inches of peat, sprinkle 2 teaspoons of garden lime, and top with 3 inches of composted manure. This helps balance pH and supports worm reproduction.
⚠️ Do not use hydrated lime (calcium hydroxide) — it can burn your worms.
Coconut Coir:
Fill at least 6 inches with moistened coir.
Best used in stacking systems like the Worm Factory, but can also work for basic DIY bins if coir is available.
Step 4: Add Food Scraps Before Worms
A few days before adding worms, bury a fist-sized amount of food scraps in the bedding. This allows beneficial microbes—what worms really eat—to begin colonizing. Great starter foods include fruit peels, veggie trimmings, coffee grounds, and crushed eggshells.
Step 5: Introduce the Worms
When your worms arrive, gently spread them across the top of your bedding. Leave the lid off for 15–20 minutes. Exposure to light will encourage the worms to burrow down into their new home. After they’ve settled, replace the lid.